
Podcast #1050: 5 Mistakes Everyone Makes With Their TVs, and How to Fix Them
 This week we look at 5 mistakes people make with their TV Settings and how to fix them and long time listener Jerry documents his transition from the Insteon Home Hub to Home Assistant. We have no email but we do discuss some of the week’s news in an episode that includes a discussion about Mead, Bourbon, Beer, and Moonshine!
| Download this Episode. |
Support the show with Patreon!
Listen to the show
Today's Show:
News:
- Harman Kardon Citation MultiBeam 1100 soundbar boasts Dolby Atmos audio
- Roku welcomes Apple Music to its lineup
- Alexa can tell you when your security camera detects a person or package
- Wyze takes on Ecobee, Nest with new room sensors for its smart thermostat
Other:
- Join the Neat Exchange - Social Media for Whiskey Drinkers
- Ara's Woodworking
- Join the Flaviar Whisky Club and get a free bottle
5 mistakes everyone makes with LG OLED TVs, and how to fix them
Thanks to their irresistible combination of futuristic, super-slim designs and consistently outstanding picture quality, LG OLED TVs have become the darlings of the high-end TV world – they're not only among the best OLED TVs, but the best TVs of any kind.
The problem is that few TVs are set up to deliver their best possible viewing experience out of the box, so if you haven't picked the right settings, you're not getting the most from your TV. So let’s look here at some of the most common set up mistakes LG OLED owners make that may be stopping them from getting the viewing experience they deserve. Full article here…
Cheat Sheet for Insteon Replacement with HomeAssistant (2.0)
Like many I was shocked to see my Insteon hub with a permanent red light and my expensive IOT devices inoperative.
A good number of ex-Insteon users are looking to other implementations of home management systems and I soon discovered that HomeAssistant does work with Insteon Devices. The help pages are well done and explain the procedures well. I am back up and running with HomeAssistant following the instructions, but it is not simple and here are some of the fine points.
The definitive solution involves either the HomeAssistant server hardware or a Rasberry Pi with the software installed. You can run the system using Virtual system implementations such as Microsoft's Hyper-V or VirtualBox.
I suggest you try Virtual Box before you decide to buy dedicated hardware. I found the Hyper-V unusable, as I have with other implementations, but the VBox works… though was not stable enough in my hands for a permanent install.
So with Ara’s financing I bought a Raspberry Pi on Amazon with the additional bits and pieces you NEED: mico-SD card for the system; mini-HDMI connector for a display as well as getting a mouse and keyboard to attach and of course an ethernet cable. Here are the nice install instructions:
Home Assistant Installation for Raspberry Pi
The set-up is self generated and you really just follow the questions.
If you did this right, the home screen will appear on any web browser populated by a lot of devices you never thought you had, including the hub.. a partial listing:
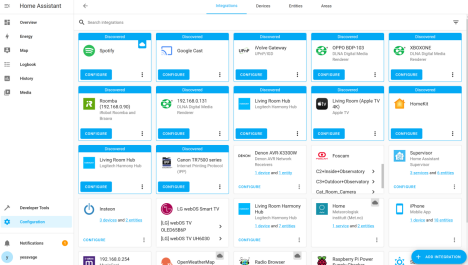
Each of these will then show up on your home screen which is your interface, as well as on your smart phone:
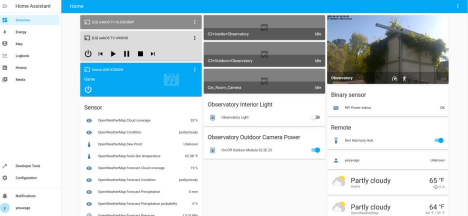
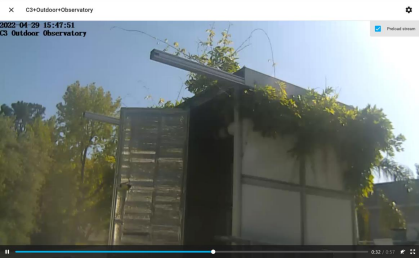
My goal was to get the cameras that I use in my astronomical observatory to work, which I did (Jerry's Astronomical Observatory)
There are many viable “canned” interfaces and contingency programming and the home page is entirely customizable… I am still learning and a real time sink. See for example the AV receiver:

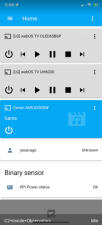
This is the iPhone interface:
The biggest problem is initializing some devices. The hub interface seems worthless as it never showed all my devices and I basically had to add them back in one by one. I made a spreadsheet with the MAC address and set fixed IP addresses for many… If you do not know what I am talking about when I mention MAC addresses or IP addresses, you will be in trouble because you need to mess with your router and set up “fixed IP addresses” for some devices… also cameras have BOTH Wi-Fi and Ethernet MAC Addresses… On the other hand, if you know what I am talking about, this is a piece of cake.
My to-do list:
1. Get the motion sensor up and running (Appears to be impossible).
2. See if there is a way to pan work the cameras (Maybe learning more Python).
3. Get the GPS location off my iPhone into the system… yes you can get this through the App.
4. Find some good models for home pages and automations… There are tons but it's hard to choose. The one I have is pretty basic.
Bottom line, all in all this is a viable option if you are familiar with the basics of networking.
Essential Afterthought: How to back-up your installation. I learned that to shut down the Pi you do not pull the power cord… you go to the Linux shell and “sudo halt” luckily my install came back after that adventure. You can backup and reinstall the SD card contents using Win32 Disk Imager:
If you put this system together, you do not want to lose it!
 Post a Comment
Reader Comments